A few months ago, I woke up excited to check my blog’s traffic. I had been working hard on my WordPress website, writing posts about my experiences with Digital Marketing.
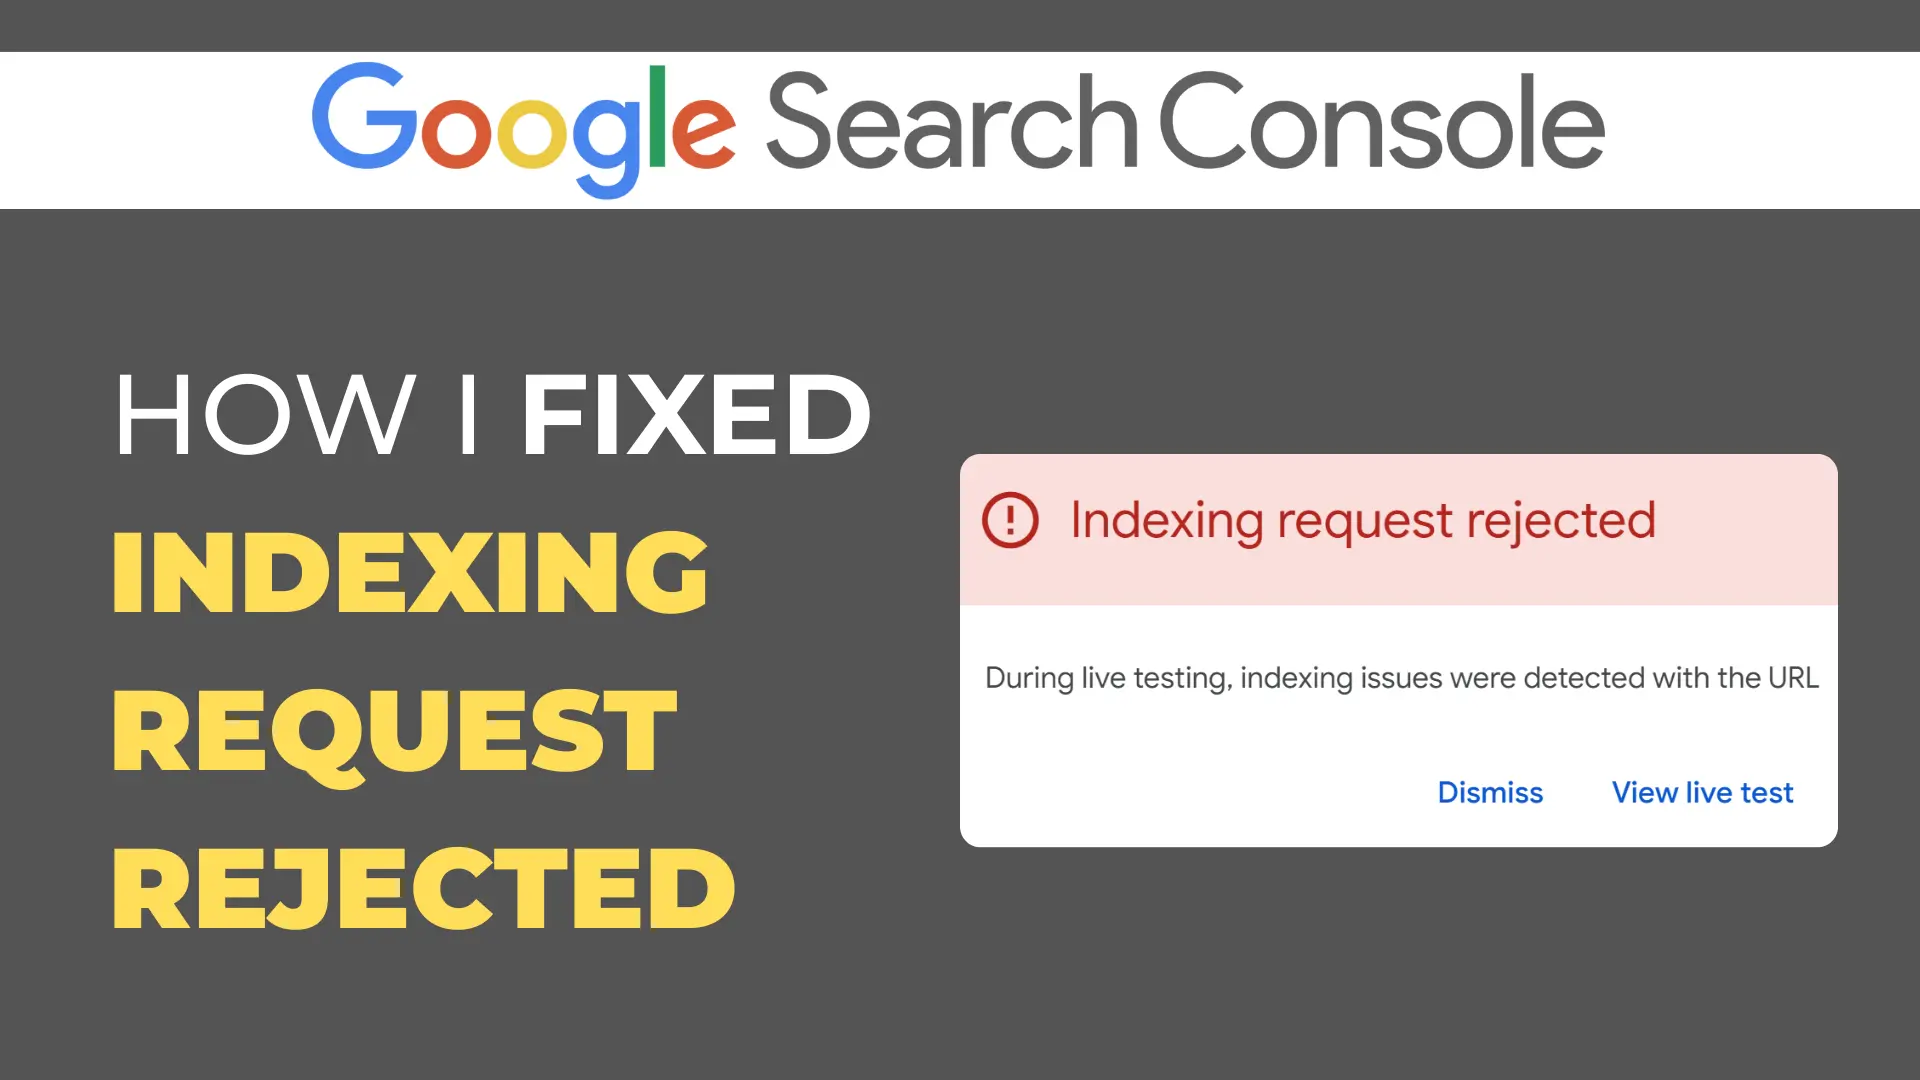
I opened Google Search Console and requested indexing of my new blog post, as it was ready. But I got a notification: The indexing request rejected. I felt confused and a little scared. Why was my indexing request rejected? What did I do wrong?
I’m not a tech expert, just someone who loves sharing ideas online. But that moment sparked a journey to determine what indexing request rejected means, why it happens, and how to fix it.
Today, I want to share my story, what I learned, and simple tips to help you avoid the same problem. If you’ve ever seen “Indexing Request Rejected in Google Search Console” or struggled with Indexing Request Rejected WordPress, this post is for you.
What is Indexing Request Rejected?
When you create a new blog post or page, you want Google to “check” it and add it to its search results. This process is called indexing.
Think of Google as a giant library, and your website is a book. Indexing is like asking the librarian to add your book to the library’s catalog so people can find it.
Sometimes, when you ask Google to index your page (through Google Search Console), it says “no” and shows indexing request rejected. This means Google won’t add your page to its search results yet.
It’s not the end of the world, but it can feel frustrating because your content won’t appear when people search for it.
When I saw the indexing request rejected, I panicked. I thought Google hated my website! But after some research, I learned it’s a common issue, especially for new bloggers or small website owners.
According to Google, over 60% of indexing requests get rejected for simple reasons like technical errors or low-quality content. That gave me hope. I just needed to find the problem and fix it.
Figuring Out Why My Indexing Request Was Rejected
Step 1: Checking Google Search Console
The first thing I did was dive into Google Search Console. If you haven’t used it before, it’s a free tool that shows how your website is doing on Google. It’s like a report card for your site.
When I checked the “URL Inspection” tool, I saw my rejected page with a note: “During live testing, indexing issues were detected with the URL.”
I had no idea what that meant. So, I started googling terms like indexing request rejected WordPress and indexing request rejected in Google Search Console.
I found forums, YouTube videos, and blog posts that explained common reasons for rejection.
Here’s what I learned:
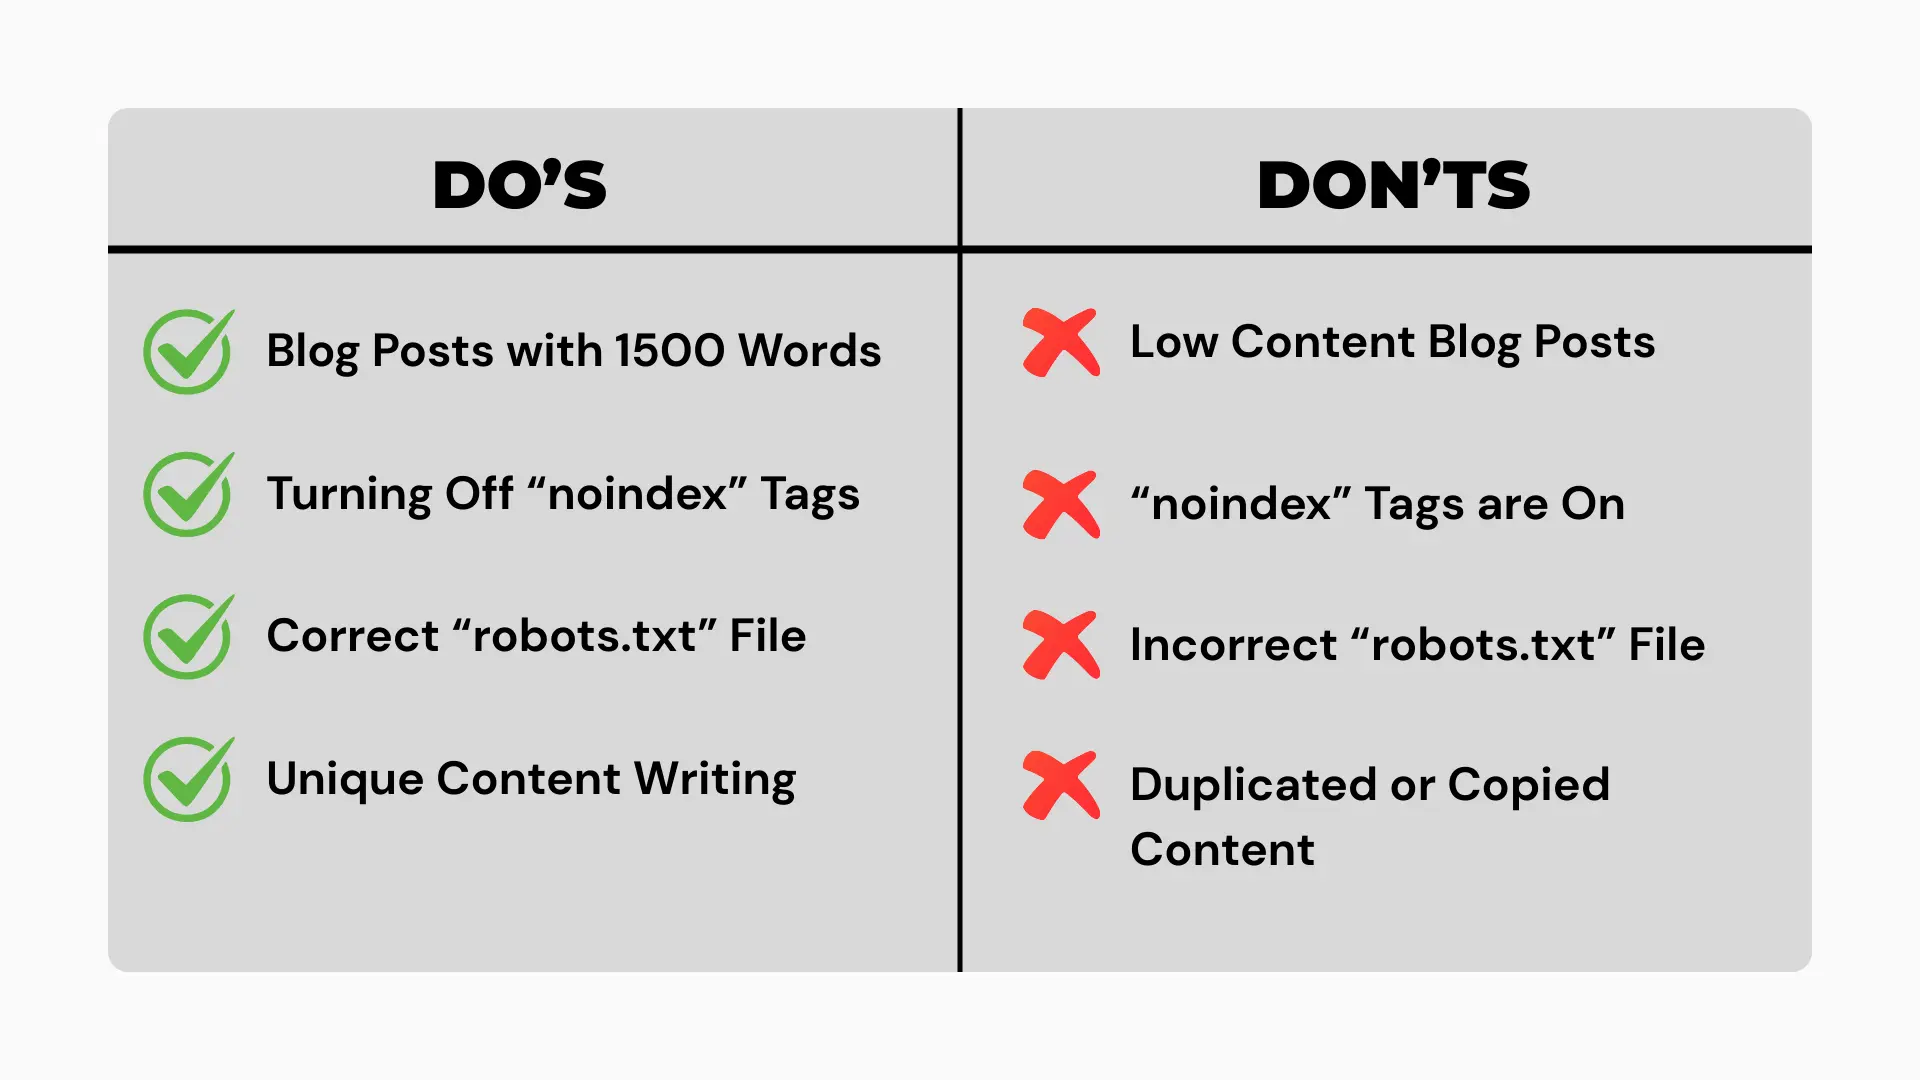
- Technical errors: Problems like broken links, server issues, or incorrect settings can stop Google from crawling your page.
- Low-quality content: If your page is too short, duplicated, or not helpful, Google might reject it.
- Website settings: Sometimes, your website accidentally tells Google not to index it (like a “noindex” tag).
- Overloading Google: If you request indexing too many times, Google might say, “Slow down!”
Step 2: Finding My Mistake
I decided to play detective. I checked my WordPress site for clues. One day, while sipping coffee and scrolling through my dashboard, I noticed something odd.
My new blog post was set to “Draft” instead of “Published.” Oops! Google can’t index a draft. I quickly published the post and resubmitted it for indexing, but the rejection notice came back.
Next, I checked my site’s settings. I use a WordPress plugin called RankMath SEO, which helps optimize my posts for Google.
I found a setting that said “Allow search engines to show this post in search results.” It was turned off! I had accidentally told Google not to index my page. I fixed that and resubmitted, but still, the indexing request was rejected.
Step 3: Digging Deeper
At this point, I was frustrated. I posted about my issue in a WordPress Facebook group, and a kind member suggested checking my site’s robots.txt file.
This file tells Google which parts of your site to crawl. I logged into my hosting provider, found the file, and saw a line that said: Disallow: /blog/. That meant Google was blocked from crawling my entire blog section!
I remembered that a few weeks earlier, I had hired a freelancer to “optimize” my site. They must have added that line by mistake.
I deleted it, updated the file, and submitted my page for indexing again. This time, Google accepted it! My post finally appeared in search results, and I did a little happy dance in my kitchen.
What I Learned About Indexing Request Rejected?
Through this experience, I learned that an indexing request rejection isn’t a punishment; it’s Google’s way of saying, “Something’s not right, please fix it.”
Here are the biggest lessons I took away:
- Google needs clear instructions: Your website must be easy for Google to crawl and understand.
- Mistakes happen: Even small errors, like a wrong setting or a draft post, can cause rejections.
- Patience is key: Fixing indexing issues takes time, and Google doesn’t always index pages right away.
- Tools are your friends: Google Search Console, WordPress plugins, and online forums can help you troubleshoot.
How to Fix and Avoid Indexing Request Rejected?
Now that I’ve experienced this, I want to share practical tips to help you fix the indexing request rejection or avoid it altogether. These steps are simple and work for anyone, even if they’re not tech experts.
1. Check Your Page Status
Make sure your page or post is published, not a draft. In WordPress:
- Go to “Posts” or “Pages” in your dashboard.
- Click on the post and check if it says “Published.”
- If it’s a draft, click “Publish.”
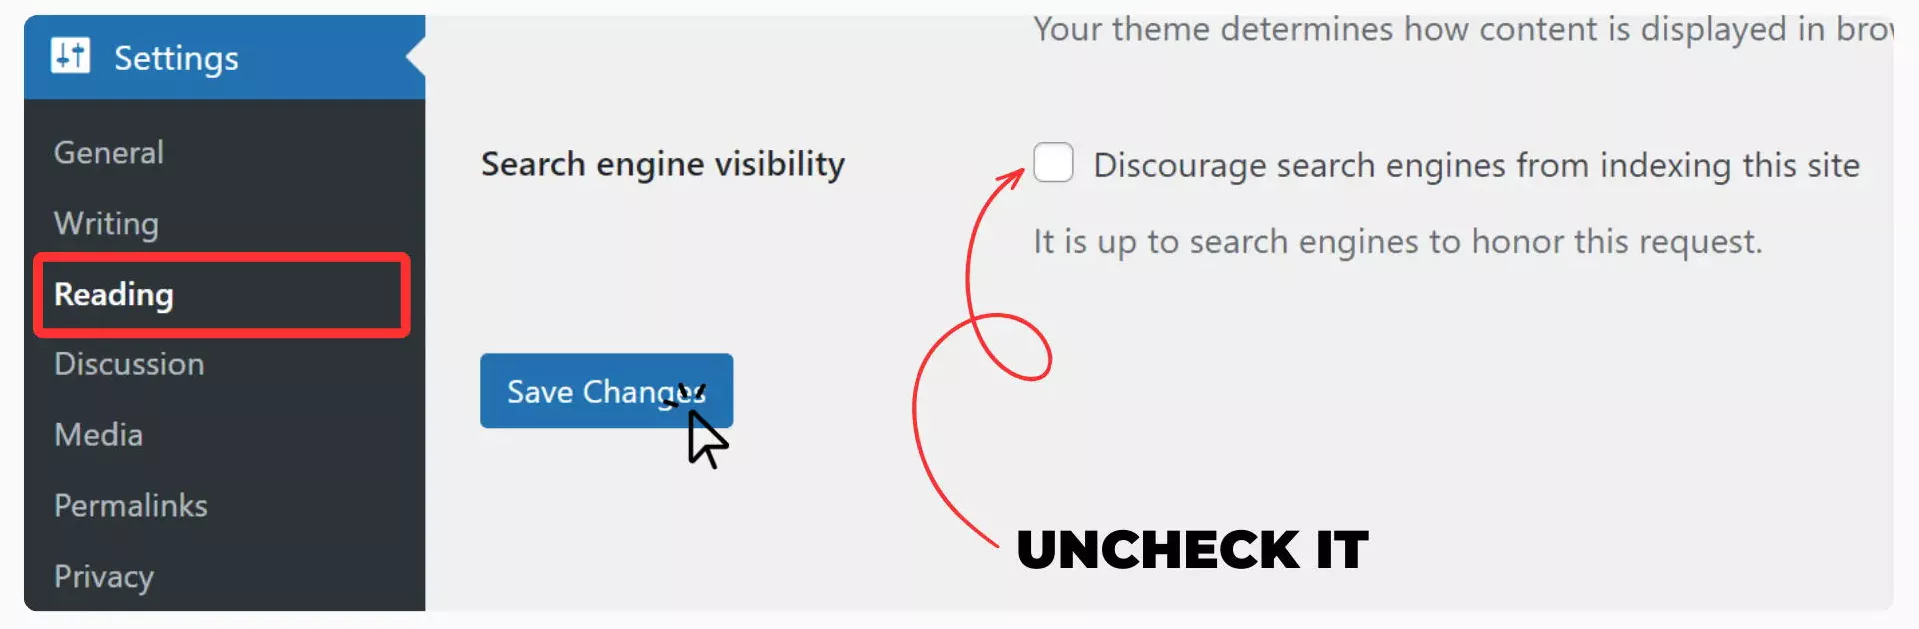
2. Verify Your Site Settings
Ensure your website allows Google to index it:
- In WordPress, go to Settings > Reading.
- Make sure the box “Discourage search engines from indexing this site” is unchecked.
- If you use Rank Math, check the post’s SEO settings to confirm it’s not set to “noindex.”
3. Inspect Your Robots.txt File
Your robots.txt file tells Google what to crawl. If it’s blocking your site, you’ll get an indexing request rejected.
Here’s how to check:
- Log in to your hosting provider or use a WordPress plugin like RankMath SEO.
- Look for the robots.txt file in your site’s root directory.
- Ensure there’s no “Disallow” rule for important pages (like /blog/).
Note: If you are using the RankMath SEO Plugin, no need to perform any edits in the robots.txt file.
4. Fix Crawl Issues
Crawl issues happen when Google can’t access your page. Common problems include:
- Broken links: Use a tool like Ahrefs to find and fix broken links.
- Server errors: Contact your hosting provider if your site is down or slow.
- Redirects: Make sure your page doesn’t redirect to a broken or incorrect URL.
5. Improve Content Quality
Google rejects pages that aren’t helpful or unique.
To make your content better:
- Write at least 1000-1500 or more words per post.
- Use clear headings, short paragraphs, and images.
- Avoid copying content from other sites.
- Answer questions your readers might have. For example, my blog posts include tips for beginners.
6. Don’t Overload Google
If you submit too many indexing requests, Google might reject them. Stick to 20–30 requests per month for small sites. Use Google Search Console’s “URL Inspection” tool to request indexing only for important pages.
7. Test with Google Search Console
After fixing issues, test your page:
- Open Google Search Console.
- Go to “URL Inspection” and enter your page’s URL.
- Click “Request Indexing” if the page is crawlable.
- Check back in a few days—“Coverage” will show if it’s indexed.
What If Everything Seems Fine?
Even after fixing my robots.txt file, I ran into another issue a few weeks later. A different blog post kept getting indexing request rejected, and I couldn’t figure out why.
I double-checked that:
- My robots.txt file was correct.
- My content was good, over 1500 words, helpful, and original.
- There were no broken links.
- The “noindex” tag was off.
- My post was published.
It felt like my website was perfect, but Google still wouldn’t index my page. I spent hours searching for answers, feeling like I was stuck in a maze.
Then, I thought about a “reset” trick using Google Search Console’s removals tool. It was risky, but it was better than getting the indexing request rejected every time.
My 3-Day Experiment
For three days, I tested this new method on my site. I stayed up late, checking Google Search Console and refreshing my browser like a kid waiting for a toy to arrive.
I wanted to make sure this trick worked before sharing it with anyone. After 72 hours, I was thrilled—it worked!
My page was indexed, and I couldn’t believe it. Here’s what I did, step by step, in case you’re facing the same problem.
A Last Fix for Indexing Request Rejected
Note: Only try this method if you’ve checked that your robots.txt, content quality, links, noindex tags, and post status are all correct.
This is a “reset” trick that worked for me, but it’s a bit like rebooting your computer; it’s not the first thing you try.
Here’s how to do it:
1. Log in to Google Search Console
Open your dashboard. It’s the place where you see all your website’s Google stats.
2. Go to the Removals Section
Find the “Removals” option from the left sidebar and click it.
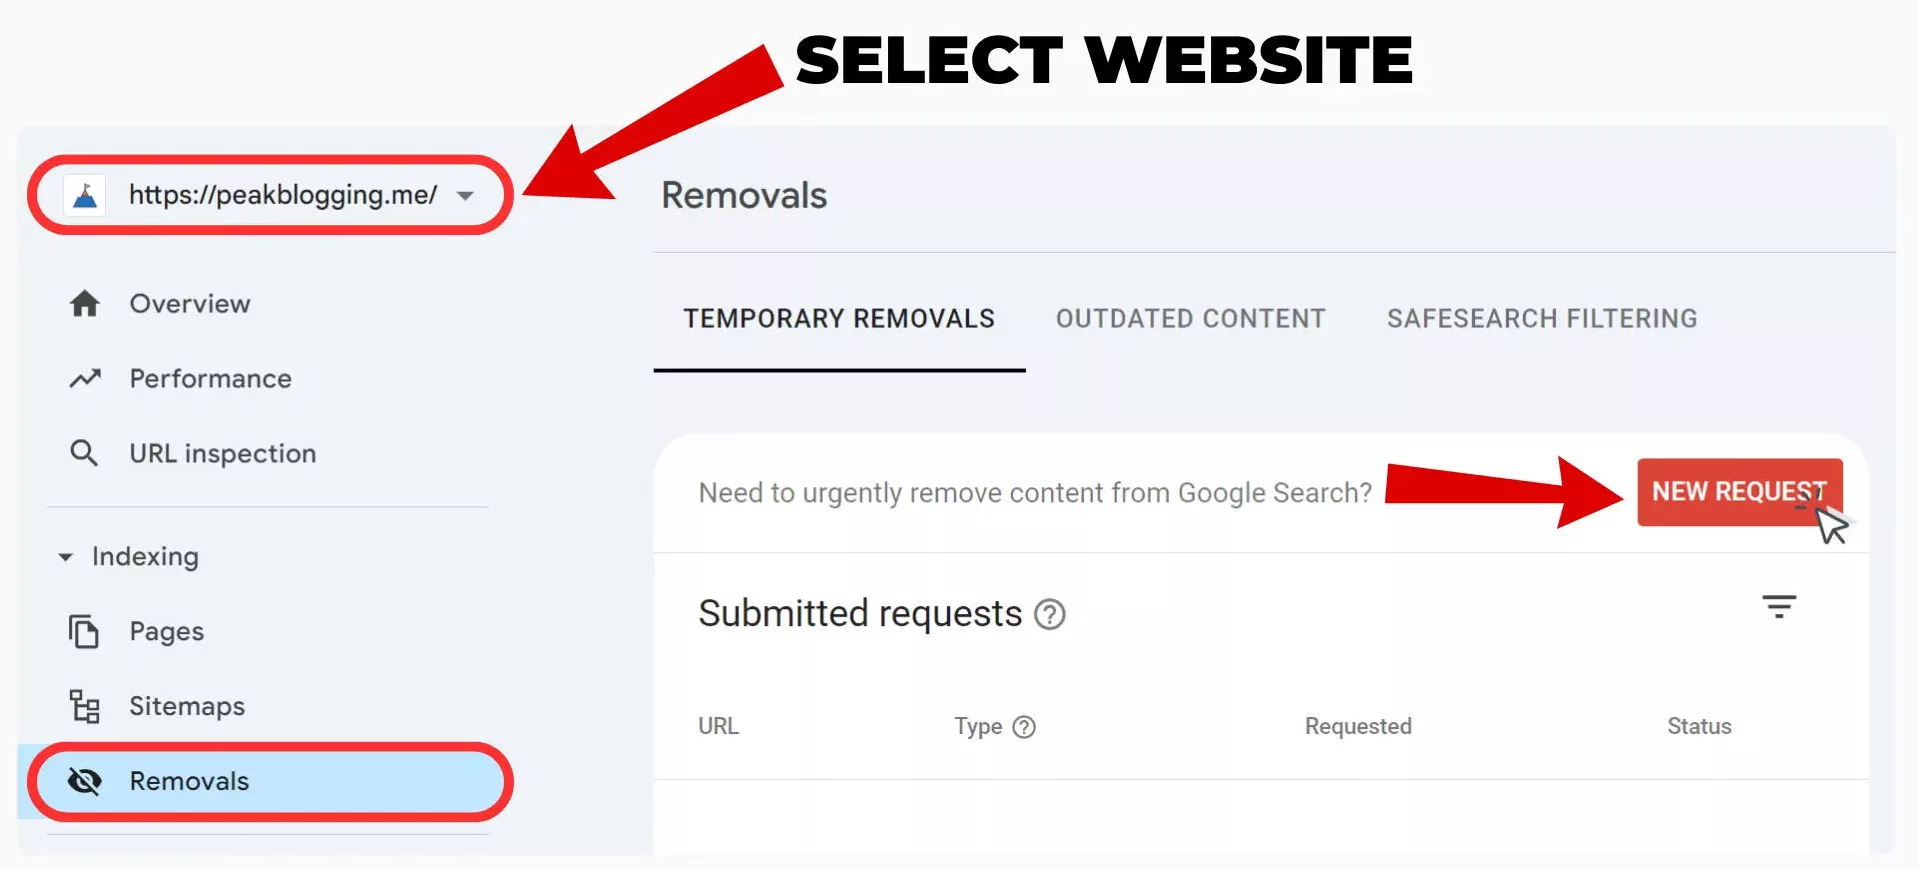
3. Request a Removal
Hit “New Request.” Type in your website’s URL (like https://peakblogging.me/). Choose “Remove all URLs with this prefix.” This tells Google to temporarily remove your whole website from the search engine results page (SERP).
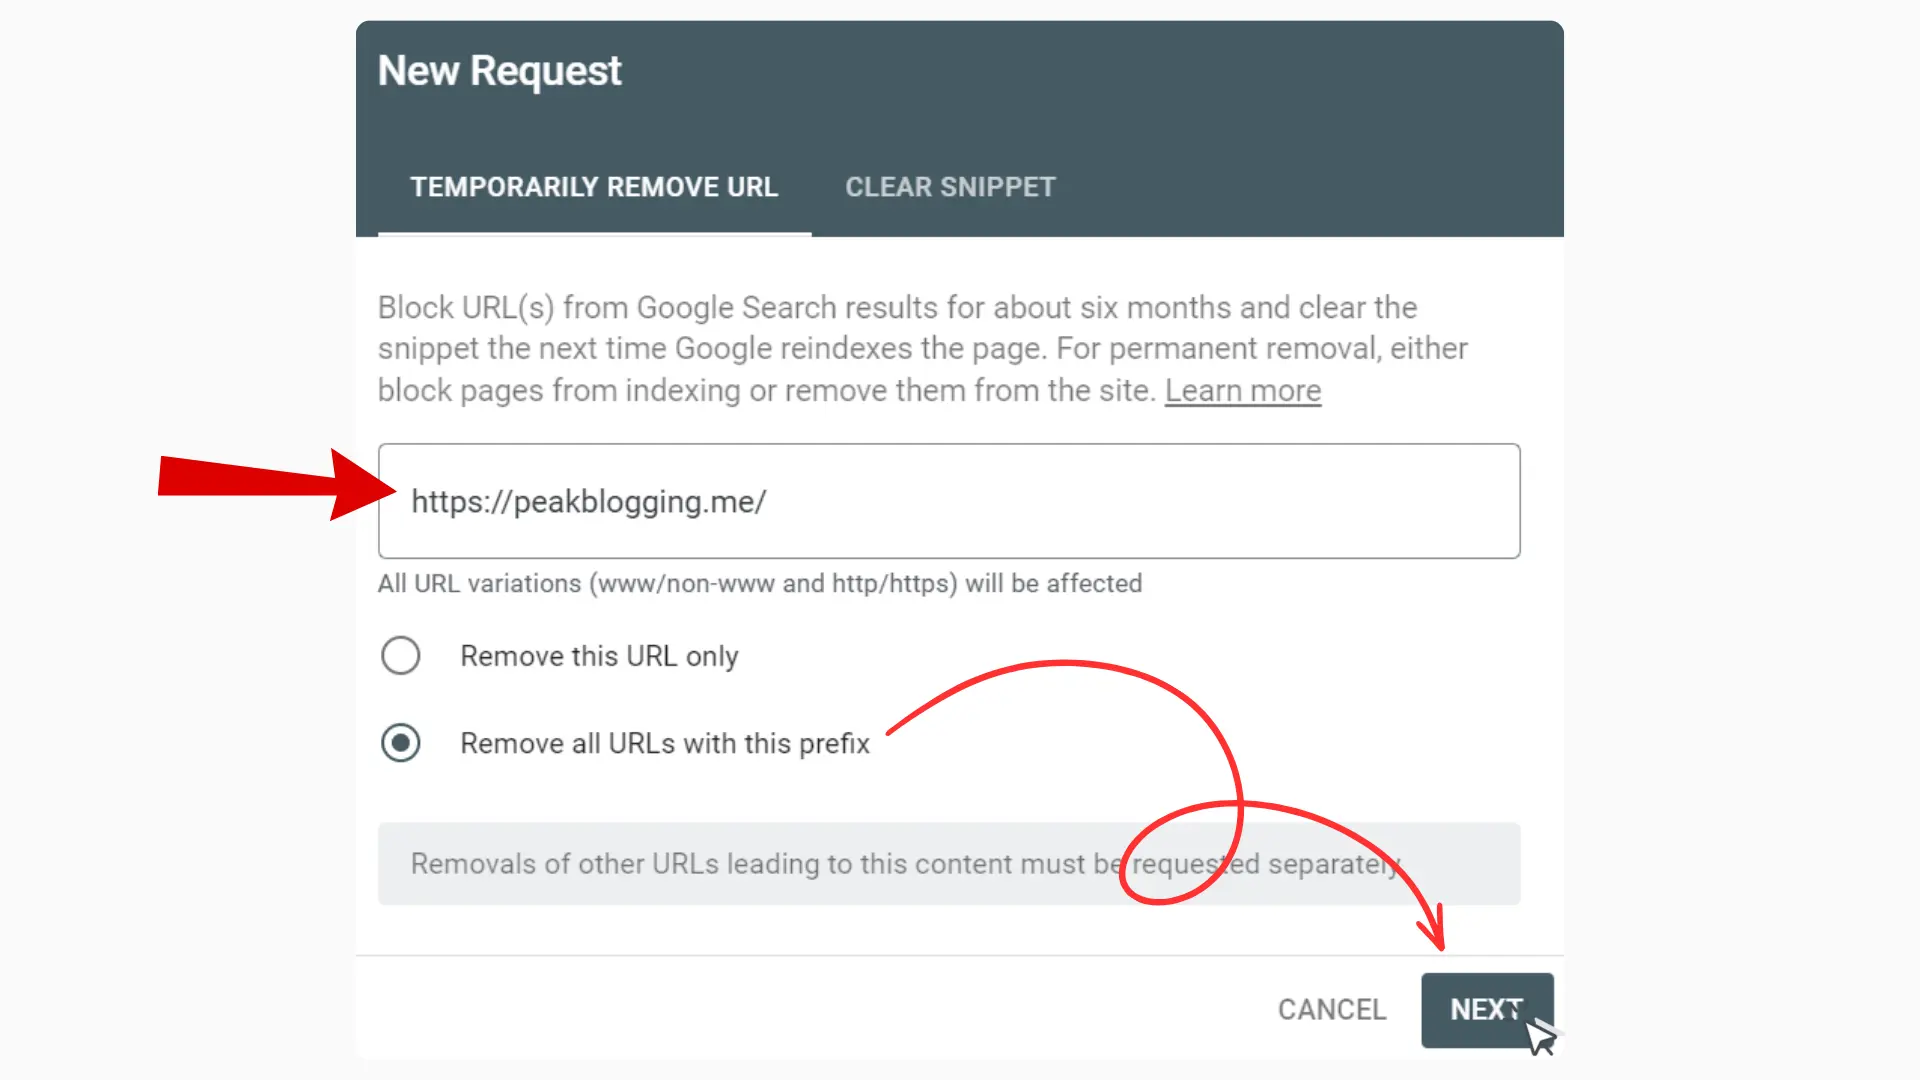
4. Submit the Request
Click “Submit.” Don’t worry, this is safe. I tested it on my site, and it didn’t hurt anything.
5. Wait 24 Hours
Google will remove your site from search results within a day. You might not see it when you search for it, but that is okay; it’s part of the plan.
6. Cancel the Removal
After 24 hours, go back to the “Removals” section in Google Search Console. Find your removal request and click “Cancel.” This tells Google to bring your site back.
7. Request Indexing Again
Go to the “URL Inspection” tool, enter the URLs of the pages or posts you want to index, and click “Request Indexing.”
8. Check Back
Wait for a few hours or a day. Your pages should start appearing in Google’s search results.
Why Does This Work?
I’m not a tech wizard, but I think this method works like hitting a “reset” button for Google. Sometimes, Google gets stuck or confused about your site.
By temporarily removing it and then bringing it back, you give Google a fresh start to crawl and index your pages. It’s like clearing a jam in a printer; it doesn’t always make sense, but it gets things moving again.
FAQs
Here are some questions I had (and others often ask) about “indexing request rejected”, with simple answers.
1. Why does Google reject my indexing request?
Google might reject your request because of technical issues (like crawl errors), low-quality content, or settings that block indexing (like a “noindex” tag).
2. How long does it take to fix an indexing request rejected?
It depends on the issue. Simple fixes, like publishing a draft, can take a day. Complex problems, like server errors, might take a week or more.
3. Can I resubmit an indexing request after rejection?
Yes! Fix the issue, then go to Google Search Console, inspect the URL, and request indexing again. Be patient—it can take a few days.
4. Does indexing request rejection mean my site is penalized?
No, it’s not a penalty. It just means Google couldn’t index your page for a specific reason. Fix the problem, and you’re good to go.
5. How do I know if my page is indexed?
Use Google Search Console’s “URL Inspection” tool or type “site:yourwebsite.com” into Google to see which pages are indexed.
Conclusion
Dealing with indexing request rejected was one of the most stressful parts of running my blog, but it taught me so much. I went from feeling lost to confidently managing my site’s SEO.
Whether you’re facing an indexing request rejected by WordPress or seeing an indexing request rejected in Google Search Console, don’t give up. Check your settings, improve your content, and use tools like Google Search Console to guide you.
My biggest takeaway? Mistakes are okay, they’re part of learning. With a little patience and the tips I shared, you can get your pages indexed and keep your website shining on Google. If I can do it, so can you!